A Bench From Wood is one of those projects that looks simple — until you try to make it safe, rock-solid, and comfortable for years. The good news is you don’t need a full furniture shop to build a bench that won’t wobble, rack, or sag. You just need the right wood, smart proportions, and joinery that matches how benches actually fail in real life: joints loosening, legs splaying, and seats cracking where stress concentrates.
- What “Bench From Wood” really means (and why benches fail)
- Safety first: workshop risks you should plan around
- Planning your wood bench: size, comfort, and stability
- Best wood for a Bench From Wood: strength, movement, and cost
- The difference between “solid” and “wobbly”
- Bench From Wood design that resists racking
- How to build a simple, sturdy wood bench
- Finishing and indoor air considerations (especially sanding)
- Common questions
- Conclusion: build a Bench From Wood that stays solid for years
You’ll learn how to design, build, and finish a wood bench for everyday use — whether it’s for a dining table, entryway, patio (covered), mudroom, or workshop. Along the way, you’ll get practical safety tips backed by reputable sources (dust, tool injury risks, and structural wood properties), plus simple options for beginners and upgrades for advanced builders.
What “Bench From Wood” really means (and why benches fail)
A bench is basically a short bridge: the seat is the span, the legs are supports, and the joints are the weak link. Most DIY benches don’t break because the wood “isn’t strong enough.” They fail because:
Short-term: the bench wobbles (racking side-to-side), especially when someone sits on an edge.
Medium-term: joints loosen as humidity changes cause the wood to expand and shrink.
Long-term: the seat sags or splits, often around knots, screw holes, or areas where the grain direction is ignored.
Understanding that will guide every decision you make — especially the choice between screws-only construction versus true joinery.
Safety first: workshop risks you should plan around
Bench projects involve cutting, drilling, sanding, and finishing — exactly the steps that create the most common hazards in home woodworking.
Wood dust is not just “messy.” OSHA notes that airborne wood dust can cause respiratory irritation and allergic symptoms, and its woodworking guidance discusses exposure limits and the need for controls like dust collection and ventilation.
Also, power-tool injuries are common enough that the U.S. Consumer Product Safety Commission (CPSC) runs a national injury surveillance system (NEISS) and has done special studies on table-saw blade-contact injuries.
A few practical rules that matter for this specific project:
Wear eye protection during cutting and drilling; face shields are great, but still use safety glasses underneath.
Control dust at the source when sanding or cutting; if you can’t, wear a properly fitted respirator. OSHA’s woodworking eTool discusses dust hazards and exposure guidance.
Don’t “freehand” cuts on a table saw. Use fences, push sticks, and proper support. If you’re not fully comfortable, use a circular saw with a straightedge guide instead.
Planning your wood bench: size, comfort, and stability
Before you buy lumber, lock in your bench’s purpose. A dining bench and an entry bench can share a style, but their best dimensions differ.
Common bench dimensions (starting points)
Here are practical ranges used by furniture makers and DIY builders:
Seat height: 17–19 in (43–48 cm) for dining; 18–20 in (46–51 cm) for entry.
Seat depth: 12–15 in (30–38 cm) for dining; 14–18 in (36–46 cm) for entry.
Seat thickness: 1–1.5 in (25–38 mm) is typical; thicker can look better, but it’s not automatically stronger if the joint design is weak.
If you want “featured snippet” friendly guidance:
Definition: A wood bench is a seated structure where strength depends mostly on joint design and racking resistance, not just the thickness of the seat.
Quick sizing table (copy/paste friendly)
| Use case | Seat height | Seat depth | Notes |
|---|---|---|---|
| Dining bench | 17–19 in | 12–15 in | Match table height and knee clearance |
| Entryway bench | 18–20 in | 14–18 in | Slightly deeper feels more stable |
| Outdoor (covered) | 17–19 in | 14–16 in | Prioritize rot resistance + finish |
Best wood for a Bench From Wood: strength, movement, and cost
Wood selection is where most people overthink hardness and underthink stability.
Softwood vs hardwood (the real difference)
Hardwoods like oak and maple tend to dent less and can be very strong, but they cost more and can be harder on tools. Softwoods like pine and fir are affordable, easy to work, and absolutely capable of holding adult weight — if the design prevents racking and the seat is supported correctly.
If you want a truly engineering-based reference point: the U.S. Forest Service’s Wood Handbook is a widely cited technical source for mechanical properties of wood and how wood behaves as an engineering material.
Great options by budget
Budget-friendly: construction-grade pine or Douglas fir (choose straight boards, minimal knots in the seat).
Mid-range: poplar (stable, paints well), ash (tough and springy).
Premium: white oak (durable, good for high-use), hard maple (very wear-resistant), walnut (beautiful, usually pricier).
For a beginner, a reliable path is: clear pine + strong joinery + thick-enough seat + a durable finish. The bench will outlive a “fancy wood + weak joints” build.
Wood moisture matters more than species
Benches loosen when the wood shrinks after you build. Use kiln-dried lumber when possible, and let it acclimate indoors a few days before milling and assembly.
If you want a structural-lumber angle (useful if you’re building from 2x stock), the American Wood Council publishes reference design values for dimension lumber in its NDS Supplement.
The difference between “solid” and “wobbly”
If you remember one thing: benches wobble because they rack, and racking is a joint problem.
Beginner-friendly (still strong)
Glue + screws with proper reinforcement: Use screws to clamp while glue cures, but add racking resistance with aprons (stretchers) and corner blocks.
Half-lap joints: Easier than mortise-and-tenon, stronger than butt joints, and forgiving.
Pocket-hole joinery: Fast and clean, but do it right — use glue, keep holes on hidden faces, and add stretchers so the joints aren’t taking all the side load.
Stronger “furniture” joinery
Mortise-and-tenon: Excellent for legs-to-apron connections.
Bridle joints: Strong and easier to cut than many people think.
Loose tenons (domino-style): Great strength with repeatability.
Bench From Wood design that resists racking
The stability upgrade most DIY benches miss: stretchers
If your bench is longer than about 36–42 inches, stretchers matter. They connect the legs so side loads don’t rely on joint friction alone.
Good stretcher patterns:
Long stretcher between leg pairs, plus a short stretcher at each end.
H-stretcher (one long + one short).
Low stretchers also double as a footrest — but keep enough toe clearance so it’s comfortable.
Preventing seat sag
Seat sag is about span length and support. You can fix sag in three easy ways:
Thicken the seat.
Add aprons under the seat (like a shallow frame).
Add a center support if the bench is long.
If you want to go deeper into “why lumber bends,” engineering resources commonly describe strength using metrics like modulus of elasticity (stiffness) and bending strength; the USDA Wood Handbook is the reputable place to cite for those concepts and comparisons across species.
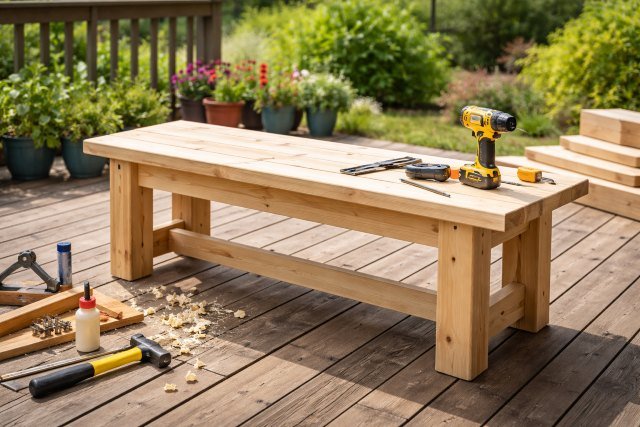
How to build a simple, sturdy wood bench
This build uses a proven structure: a thick seat, two leg assemblies, and stretchers that lock everything together. You can scale length up or down.
Materials (typical)
Seat: 1×12 or laminated boards to your desired depth, or a glued panel.
Legs: 2×2 or 2×3 stock (or laminated 1x boards for cleaner grain).
Aprons/stretchers: 1×3 or 1×4, or milled equivalents.
Glue (wood glue), screws (if used), and finish.
Tools (minimum)
Saw (circular saw + guide is fine), drill/driver, clamps, sander, measuring/square tools.
1) Mill and prep your boards
Cut everything oversize first, then square and trim to final length. This reduces twist and keeps things aligned.
Look for straight grain for legs and stretchers. Avoid big knots near joints.
2) Build the leg assemblies
Each leg assembly is two legs connected by an apron (or upper stretcher) near the top.
If you’re using half-laps: cut matching half-depth notches and glue/clamp.
If you’re using pocket holes: drill on the hidden face, glue the joint, then screw.
Keep the assembly square; a bench that’s out of square will wobble forever.
3) Add the long stretcher(s)
Connect the two leg assemblies with a long stretcher on each side, or one centered stretcher if your design is compact.
This is where stiffness is born. If you’re going to spend extra effort anywhere, spend it here.
Pro tip: If you can, notch the legs so the stretcher shoulders against the leg. Mechanical “shoulders” resist racking better than screws alone.
4) Attach the seat (allow wood movement)
Wood moves across the grain with seasonal humidity. If you screw a wide seat down tight with no allowance, you invite cracks or loosened joints.
Better options:
Use figure-8 fasteners or z-clips.
Use slotted holes in the apron so screws can slide a bit as the seat expands/contracts.
If your seat is a narrow board (or a few narrow boards), movement is less dramatic, but it still exists.
5) Sand, ease edges, and test stability
Ease the front seat edge so it’s comfortable on the backs of legs.
Then do a real wobble test:
Press on the seat corners diagonally.
Sit on one end, then the other.
Drag it slightly — if it racks, you need stronger stretchers or corner blocks.
6) Finish for durability
For indoor benches:
Hardwax oil: easy repair, natural look.
Wipe-on polyurethane: more protective, takes longer.
For covered outdoor areas:
Exterior-rated finishes help, but design choices and wood selection matter too. Avoid trapping water in joints.
Finishing and indoor air considerations (especially sanding)
When you sand, you create the finest dust — the stuff that stays airborne longest. OSHA’s woodworking resources discuss wood dust as a health concern and recommend controls like ventilation and dust collection.
If you’re staining or using solvent-based finishes, ventilate well and follow the finish manufacturer’s safety instructions.
Common questions
What is the strongest joinery for a wooden bench?
Mortise-and-tenon joinery is one of the strongest options for a wood bench because it creates long grain-to-long grain glue surfaces and resists racking when someone sits or shifts weight.
How thick should a wood bench seat be?
A typical bench seat is 1–1.5 inches thick. For longer benches, add aprons or a center support to prevent sag instead of relying on thickness alone.
Can I build a bench from construction lumber (2x4s)?
Yes. Construction lumber can make a strong Bench From Wood if you select straight boards, let them acclimate, and add stretchers/aprons to resist racking. Structural design values for dimension lumber are published by the American Wood Council in the NDS Supplement.
How do I stop my wooden bench from wobbling?
Wobble is usually racking. Add or strengthen stretchers, ensure leg assemblies are square, and use joinery with shoulders (half-laps, mortise-and-tenon, or bridle joints) so the structure can’t shift under side loads.
Is wood dust dangerous when building a bench?
It can be. OSHA notes airborne wood dust can cause respiratory symptoms and other health effects; controlling dust during sanding and cutting is recommended.
Conclusion: build a Bench From Wood that stays solid for years
A Bench From Wood doesn’t have to be complicated — but it does need to be intentional. Choose straight, stable boards, design for racking resistance with stretchers and aprons, and use joinery that creates mechanical strength instead of relying on screws alone. Sand and finish carefully, control wood dust as recommended in OSHA’s woodworking guidance, and your bench will stay safe, sturdy, and good-looking through daily use.